Replay Making
From our very own Myles (from the Fleet Operations' forums):
You’ve probably seen replays (a recording of a game); this section will explain to you how to make some of your own. Most replays involve the recording person commenting on the game as it is being played, recently with the aid of co-commentators. Replays made for Fleet Operations can be found in the Video Database section of the guide.
The main reason for replays is entertainment value. People enjoy watching them, especially when they have commentary. Replays also help new players see the game being played and understand some common strategies and maps.
The Basics
Replays are made using screen recording software, which, unsurprisingly, records what you see on your screen, and for commented replays, records what the replay maker is saying into their microphone. The replay maker sets themself as an observer for a game, so they have line of sight for all units on the map. Observers cannot use the in-game chat system, so you won’t be able to communicate with the players. Observers can pause the game, though, so you can handle unexpected events and edit out undesired parts of the replay.
These replays are usually big because there isn’t the processing power to run a 3D game, record it and compress video on the fly. Most replays will be roughly 4 gigabytes of video per hour. After the game the video is compressed down to hundreds of megabytes so that it can be uploaded to the internet easily.
Recording a replay may slow your computer down, so first try making a 1v1 replay to see if your computer can handle it.
Replays will nearly always be uploaded to video sharing sites (a euphemism for YouTube, the only serious site with the bandwidth and support for HD video). If you find a better service, let replay makers know via the forums :).
Most replay makers then make a post in the forum’s Awesome Replays Thread with an overview of the match and a link to the video to watch. Feel free to send a message to Dominus_Noctis via the Fleet Ops' forums PM or email to get permission to add videos to the guide's video database.
Recording the Match
When recording a replay it is best to make sure you are in a quiet room, with a reliable internet connection and are unlikely to be disturbed. A common thing to forget is to prevent phones from ringing; pets may also prove disruptive.
Most players use Tunngle to play Fleet Operations. As you know, Tunngle beeps for a variety of reasons. On Windows Vista/7 there is a volume mixer to mute specific programs; this can be accessed by clicking the volume icon in the notification area and clicking mixer, there you can mute Tunngle. If there is no volume bar for Tunngle then that means Windows isn’t aware that Tunngle supports generating sounds, probably because Tunngle hasn’t beeped in a while. If this is the case, just make Tunngle beep yourself, or get somebody to send a chat message in the Fleet Operations room and Tunngle will beep, adding a mixer bar for Tunngle, allowing you to promptly mute it. It will disappear after a while if Tunngle doesn’t try to beep, so have someone send a message again to make it reappear so you can unmute it. You can also mute Tunngle itself via the System -> Sounds tab.
To comment on your replay you will almost certainly require a high quality microphone. To avoid echo, headphones are definitely in order. A headset, combining headphones and a microphone, would be a great investment. £20 will easily get you a headset of acceptable quality for replays. It is likely the headset will have a boom for the microphone, make sure that this is moved far enough away from your mouth to prevent your breath being picked up loudly.
Most screen recording software will have a customizable hotkey for starting and stopping recording. Try not to set this to anything that would clash with a Fleet Operations hotkey.
Keep a glass of water (or any other drink) handy during commentaries to avoid sounding hoarse or having to clear your throat.

Picking video settings can be difficult and wrong settings can easily result in unwatchable video. Nearly all replay makers record in High Definition as games look bad at lower quality. Having the game run at the resolution you want the video to be in is definitely recommended. For nearly all replay makers this is HD 720, which has a resolution of 1280x720, which is more than enough quality for a replay. This is a 16:9 ratio resolution, matching the YouTube player resolution, and YouTube is easily compatible with 1280x720 video, so I highly suggest running the game in this resolution. A lot of screens are of a resolution and ratio that is close to this. If your screen is larger, but of a different resolution (such as 4:3), then running Fleet Operations in windowed mode rather than full screen will keep the game looking nice.
Screen recorders that are designed to record DirectX output (such as Fraps and PlayClaw) will only record the Fleet Operations window by default, as it should be the only DirectX program running. Screen recorders that record everything on the screen should be configured only to record the Fleet Operations window. The Aero theme for Windows Vista/7 uses a service called Desktop Window Manager (DWM), which draws the desktop using DirectX. Certain DirectX screen recorders may be able to capture this. In Fraps the option is in the General tab and is called “Monitor Aero desktop (DWM)” and should be unchecked or Fraps will capture everything. Other versions of Windows don’t use DirectX for any Windows programs/services, so such consideration is unnecessary.
Here are some examples of popular screen recorders.
|
Name
|
Free
|
DirectX or Everything
|
Records multiple sound sources*
|
|
Fraps
|
No
|
DirectX
|
Yes
|
|
CamStudio
|
Yes
|
Everything
|
Yes
|
|
PlayClaw
|
No
|
Dunno
|
Yes
|
|
WeGame
|
Yes
|
Dunno
|
Dunno
|
* needed for recording commentary.
At the beginning of replays it is customary to bring up the Fleet Ops Communications Menu to see the colors and names of the players. Then go to each player one by one and identify their faction and avatar and possibly describe their play style if you know it.
Pay special attention to what they build and research and try to guess what they are going to do. Pay attention to the build orders in particular. The new sound engine (FMOD) will make sounds audible from a distance, so you should be able to hear distant battles. Watching the minimap will also help avoid missing any action.
Clicking on a unit from any race will make their resource count appear in the top left, so check resource counts regularly. Currently observers must select the random/Borg race in pre-game setup to get the ability to see the collective connections count for players.
Criticism is part of commentary, but replay makers are frequently wrong, and counter tables/detailed unit stats aren’t usually available during replays. As a consequence try to be constructive in your criticism and to see how a particular strategy could be good for a player, even if you wouldn’t personally use it.
You can choose to end the game when a player first says gg, or wait until they quit, or replace quitting players with computer AI players in order to see the explosions.
Post-Game
If you desire you can save the Admirals Log as a text file by pushing the save button, also you can take screenshots of the screens and put them at the end of the video. The three screens most often kept are Military, Economy and Timeline. The others are either useless or convey too much information to easily capture.
After the recording is complete you should be left with a large amount of video. As this video is uncompressed it may play poorly in common media players as the media player can’t access enough data per second. When compressed the video will be fine.
To do the compression you will need some video editing software, and most importantly, time. If you followed my advice to run the game at the resolution you want the video to be in (most likely 1280x720) then you won’t want to change the resolution, just compress. The format you should compress to should be anything YouTube supports. Windows Media Video (WMV) is an example of such a format. Compression can take hours easily depending on video length, and uploading to the web a similar amount of time. Your computer’s processor will be using a lot of its capacity to compress the video, so you won’t be able to run games or other high-end software. During the upload to YouTube your internet will be taxed and websites will load slowly. Thus, it is good to start the compression and upload and leave your computer for a while. Advanced video editing programs (e.g. Sony Vegas Pro) can use multiple computers on your network to distribute the processing task, although this is rather tricky to set up, and a decent network of computers is required.
YouTube currently imposes a 15 minute length limit on uploaded videos for most users; this will be lifted after your account has been active and clean for a while. If you are still restricted by this limit, then you will need to split your output video into parts, each of which is less than 15 minutes in length. Then each piece will be uploaded as a separate YouTube video.
Here are some examples of common video editing programs:
|
Name
|
Free
|
Supports WMV
|
|
Windows Movie Maker
|
Yes
|
Yes
|
|
Windows Live Movie Maker
|
Yes
|
Yes
|
|
Sony Vegas Pro
|
No, expensive
|
Yes
|
|
VirtualDub with Xvid Codec
|
Yes
|
Not by default
|
When the video is uploaded to YouTube it can take an hour to process so that HD is ready for people to watch. During this time you can prepare the forum post with all the bells and whistles, maybe have a cuppa. When you’re done you will then have a completed replay.
I like to rewatch the replay before making it available to the public (you can switch between private & public for videos in YouTube). When rewatching, you have the benefit of hindsight and can make annotations correcting whatever mistakes you may have made in the video.
Co-Commentaries
If you would like to, you can include multiple commentators in a replay, who will talk with you. I do it because these co-commentators are usually smarter than me and know more about Fleet Operations and so can make my replays better and it also adds variety. Likewise more eyes watching the game mean that you are less likely to miss crucial developments. A downside is that you may end up talking over each other.
The most common way of having two commentators on a replay is to have all the commentators talk over TeamSpeak. Screen capture software will detect the sounds from TeamSpeak just as it detects the game sounds. Commentators should meet in a channel that is passworded so that non commentators cannot join and ruin the replay.
See the TeamSpeak page for a better description of the TeamSpeak functions.
Example: Fraps & Windows Live Movie Maker

I personally use Fraps & Windows Live Movie Maker (WLMM) to make my replays, so I will give a description of how to make a replay using these programs. I like this method because it is simple and gets the job done.
First of all feel free to experiment with settings in offline games to see what is best for you.
Very old versions of Fraps will split video files into about 4 gigabyte chunks, which you will need to combine when you compress. Newer versions will create one file on NTFS format disks (don't worry, that's been the standard since Windows XP).
In Fraps I set the frame rate as around 30 frames per second (fps), this should easily give a smooth output. Weaker computers may get lower frame rates, so feel free to lower this value to around 24 (TV FPS).
Record Win7 sound: Tick this to get game sound in your video. Note that it will also record TeamSpeak. Note that this option will reflect your operating system, Fraps works with Vista as well as 7, but on Windows XP Fraps can only record from the Microphone.
Record external input: This is used for recording sound from a microphone for commentary
Once in WLMM I use an AutoMovie theme to get some nice eye candy stuff like titles, then I customised it to my liking. Feel free to experiment as the software lets you preview changes before you make them.
WLMM deals with the raw video and images as separate bits, which you can manipulate independently. It puts the elements in a timeline, and when the video is made they will be stitched together. Each raw chunk of video and each image/title screen will get its own piece.
You can drag and drop the raw video files into the timeline area of WLMM. You can also drag and drop the images there too, putting them at the end usually.
Beware that WLMM absolutely loves adding random effects to your video, such as making parts black and white, or panning images. It will add these at its discretion and you will have to manually hunt down the effects and disable them when you don’t want them. Hovering the cursor over a segment of the video will display a description of that segment, including effects applied. When a video has effects applied to it, a small icon will appear in the top left of the segment. A transition from element A to element B will be defined by clicking on element B and setting the transition. When a transition has been set into an element, a grey wedge will appear at the bottom left of the segment.

When I am finished setting up WLMM how I want it I just push the YouTube export button in the Home tab, select the recommended resolution (which should be the resolution of the raw video) and enter my credentials. It will then compress it, creating a video file which it will store in the Windows Temp directory, and then upload it to my YouTube account all in one go. When it’s finished uploading it will give you the option to view the Temp folder, which I do to move the video file to a convenient location.
If you wanted to compress, but not upload, you could select the Save Movie menu in the Home tab, and hovering over the Recommended for this project should hopefully show the resolution of the source video. WLMM likes WMV so that’s what you will get, which is fine as YouTube deals easily with this format. Custom settings will give advanced settings such as changing the resolution if you so desire.

WLMM works best if you are aiming to upload the video to YouTube in 1 piece. If you are limited to 15 minute videos then you will need to split the files. The easiest way to do this is to make a note of the split points, then import the raw video(s) into WLMM and use the split tool to leave only the bits you desire in the timeline, then use the YouTube export button. You will have to do this for each part.
Example: Fraps & Sony Vegas Pro
The Fraps component works as above.
Sony Vegas Pro is an expensive and complex piece of software. If you need help with it you can probably check with Funnystuffpictures, a forum member who works with it.
It works with a timeline system like WLMM, but makes it easier to split the videos as you can select a region of the timeline, then go to File -> Render As and check the box to render only the selection area of the timeline. That way you don’t need to repeatedly import the raw video. The export settings must be carefully set so that you get a video of the same resolution as the raw video. WMV is again a good choice of format. Sony Vegas Pro does take much longer than WLMM to export, though.
I haven’t experimented with fancy stuff like titles with Sony Vegas Pro, as I no longer use it.
Example: Fraps and VirtualDub using Xvid codec
From our very own Denarius (from the Fleet Operations' forums):
Fraps use as described in previous examples.
VirtualDub is a free video editing program; it requires codecs on your system to compress video files. Windows comes with some basic codecs, but I recommend using the Xvid codec, which is free and can be found at xvid.org. Make sure Xvid is installed to your system before running VirtualDub; installing Xvid is all you need to do.
VirtualDub uses the common timeline based video editing that you will see in programs like Sony Vegas.
Importing and Editing a Video
Importing a video can be done by going to File -> Open video file…

Use this to import the first AVI file that Fraps outputs. You can add each following AVI file via File -> Append AVI segment… this will put the new video immediately at the end of the current one on the timeline. Once you have added all of the segments you will have the entire replay in VirtualDub.
If you are uploading to a YouTube account with a 15 minute time limit then you will need to create multiple video files of less than 15 minutes of length. To do this you can select a time range in VirtualDub, and once a time range is selected, only that range will be exported when you export a video file. In this way you can repeatedly select ranges, exporting each as you go. Keeping a list of the times for each range will be helpful. As you will need to know the time in ms or the number of frames, it’s easier to use frames, since moving the seek bar (on the timeline) in the main window will show the position in frames. Go to Video -> Select Range…
Modify one of the columns only (which one depends on whether you are using ms or frames), changing two rows will force the third row to update to match. “Start offset” is the distance from the start that the selection range should start, “End offset” is the distance from the end that the range should finish. Yeah, this will be messy. One way is to find the starting frame count of your desired range (seek to this time in the main window), then find the end point frame count, subtract to get the difference and put the start count into “Start offset” and the difference into “Length”, the “End offset” will update automatically. Another way is to specify where to start the segment is to give the start offset in ms and then specify how long the segment should be in ms. The rest will be updated accordingly. Once this is done, the selection range will be blue on the timeline in the main window. Try and give a little overlap at split points, to avoid cutting off anything.
Next we configure the compression to use: go to Video -> Compression…
You will see this image:

Now select Xvid (called Xvid MPEG-4 Codec) and click <Configure>
Click <Quantizer> to change it to <Target Bitrate (kbps)>
You will see the window in this image (with different numbers of course):
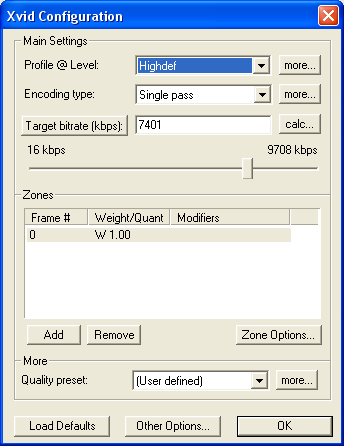
Click <calc…> and you will see the window in this image (again numbers may vary):

Set “Target size (kbytes)” to 716800, this can be done using the drop down menu.
Change the “Video” settings to match your video, remember what value you chose in Fraps for frames per second. Since the segments will be about 15 minutes long the following settings should be:
Hours: 0
Minutes: 15
Seconds: 0
Frames per second: The frame rate which Fraps captured at.
“Size (kbytes)” will change to around 702303 automatically.
“Average bitrate (kbps)” will change to around 6392 automatically.
Don’t change the audio settings, the default is fine.
Because we don’t want to change the quality of the video segments, we want leave the “Video” settings as it is, even if the segment itself is shorter or a little longer then exactly 15 minutes.
You can always experiment with the settings of Xvid. I found that this was a good setting to begin with.
Uploading and Encoding
This will create a file of about 700 MB in size, which is big (movie size), but guarantees good quality. Each segment you export will be this big, so if your internet connection isn’t very fast and you don’t want to be uploading such large amounts of data, try put in a lower “Target size (kbytes)” value. Around 200000 (200MB) should give enough quality for YouTube.
If you have a multi core processor you can allow the program to run in a single core which will improve system responsiveness during encoding. Go to Options -> Preferences, then select the “Threading” section and change the only modifiable value to 1.
To export the file which we plan on uploading to YouTube, click File->Save as AVI… and select a location and name. This will export the blue selection range (or the whole video if no such range is given), so you will do it once for each sub 15 minute YouTube part you will have.
During encode there will be two windows open. In the first you are welcome to uncheck “Show input video” and “Show output video” if you don’t need your computer showing you these.