Dominion Unit Analysis
Table of Contents
- Counter Table
- Units of the Dominion
- A-4 Scout - Cloning Facility
- A-20 Attack Destroyer - Construction Yard (passive: Autonomous Defense AI - strong versus medium range, weak versus support ships)
- A-26 Bomber - Construction Yard + Prototype (passive: Fast Tracking Computers - strong against short range, weak against long range)
- S-2 Escort Cruiser - Construction Yard + Prototype (passive: Tactical Weapon Arrays - strong versus long range, weak versus short range)
- C-11 Interception Destroyer - Construction Yard + Prototype (passive: wolf in sheep's clothing)
- Breen Cruiser - Construction Yard + Prototype (passive: Single Stage Energy Conduits - strong versus medium range, battleships, weak versus stations, destroyers)
- B-8 War Frigate - Construction Yard + Prototype
- T-15 Heavy Cruiser - Large Construction Yard (passives: Ablative Armor Plates - strong versus short range, weak versus long range)
- C-17 Siege Cruiser - Large Construction Yard + Prototype (passive: Extra Energy Stores - strong versus stations)
- B-5 Battle Cruiser - Large Construction Yard + Prototype
- V-13 Battleship - Large Construction Yard + Prototype
- Breen Battleship - Large Construction Yard + Prototype (passive: Single Stage Energy Conduits - strong versus medium range)
- S-7 Defender - Large Construction Yard + Prototype (passive: High Density Shield Generators, Charged Polaron Beam - strong versus long range, large-sized units)
- Hyperspace Artillery - Worker Ship + Large Construction Yard + Technology Lab + Ketracel White Facility
- Special Dominion Stations
- Dominion Turret System
Counter Table
Lists the units that the vessels of this faction counters. To see what units counter the listed vessels, visit the other Unit Analyses.
Note: A counter is considered a unit that deals superior damage to its foe (or takes less) – not one that does extra damage, yet is still more readily damaged. Only strong counters are listed as weak counters are useless unless taking into consideration superior micromanagement, which cannot be accurately predicted. An example of a weak counter is a Canaveral versus Canaveral: both take increased damage.
Blank spots do not indicate that the vessel is useless, just that it is a generalist and does not have a special passive which enables it to do more to a particular unit.
| Construction Yard Vessels | Borg | Dominion | Federation | Klingon | Romulan |
| A-20 Attack Destroyer | Probe, Adaptor, Sphere, Pyramid, Cube | B-5 Battle Cruiser (Pure), V-13 Battleship | Akira, Sovereign, Nova, Galaxy, Nebula and Refit, Descent | Vutpa', Chargh, Vor'cha, K'beajQ | Griffin, Generix, Generix Spectre Refit, D'deridex, Tavara |
| A-26 Bomber | Interception / Beam / Regeneration Scout Cube | B-5 Battle Cruiser (Breen) | Intrepid | Chargh, Negh'var, BortaS, LuSpet | Leahval |
| S-2 Escort Cruiser | Dodecahedron, Assimilator, Diamond | B-8 War Frigate, S-7 Defender, Breen Cruiser, Breen Battleship | Saber, Excelsior II, Avalon, Phalanx, Excelsior | Sang', Cho'naQ | Rhienn, Rhienn Disruptor Refit, Rhienn Torpedo Refit, Cehlaer, Norexan |
| C-11 Interception Destroyer | A-20 Attack Destroyer | Intrepid, Excelsior | LuSpet | Eresis | |
| Breen Cruiser | Adaptor, Sphere, Pyramid, Cube | Breen Battleship, V-13 Battleship, B-5 Battle Cruiser, C-17 Siege Cruiser | Akira, Remore, Galaxy, Nebula and Refit, Descent, Sovereign, Avalon, Phalanx |
Chargh, LuSpet, BortaS, Vor'cha, Qaw’Duj |
Eresis, D'deridex, Tavara, Griffin |
| B-8 War Frigate | A-26 Bomber | Canaveral | Chargh | Shrike |
| Large Construction Yard Vessels | Borg | Dominion | Federation | Klingon | Romulan |
| T-15 Heavy Cruiser | Scout Cube | S-2 Escort Cruiser, A-26 Bomber | Intrepid, Defiant, Canaveral, Norway | B'rel, K'Vort, SuS'a', Chargh | Leahval, Shrike |
| C-17 Siege Cruiser | A-20 Attack Destroyer | Intrepid, Excelsior | LuSpet | Eresis | |
| B-5 Battle Cruiser | Breen: S-2 Escort Cruiser | Breen: Galaxy | Breen: Negh'var | Breen: Norexan | |
| V-13 Battleship | |||||
| Breen Battleship | Adaptor, Sphere, Pyramid, Cube | V-13 Battleship, B-5 Battle Cruiser, C-17 Siege Cruiser, A-26 Bomber | Akira, Remore, Nebula and Refit, Descent, Sovereign, Avalon, Phalanx | Chargh, LuSpet, BortaS, Vor'cha, Qaw’Duj | Eresis, D'deridex, Tavara, Griffin, Generix, Norexan |
| S-7 Defender | Dodecahedron, Assimilator, Sphere, Pyramid, Diamond, Cube | V-13 Battleship, B-5 Battle Cruiser, Breen Battleship, A-26 Bomber, B-8 War Frigate, T-15 Heavy Cruiser | Avalon, Sovereign, Phalanx, Nebula and Refit, Descent, Saber, Canaveral, Excelsior II, Excelsior | LuSpet, BortaS, Sang', Cho'naQ, Chargh | Eresis, D'deridex, Tavara, Rhienn, Rhienn Disruptor Refit, Rhienn Torpedo Refit, Shrike, Norexan |
Units of the Dominion
A-4 Scout - Cloning Facility

It’s a scout. You scout stuff with it. Oh, and scout everywhere. Or something. >=D . Remember to scout early so that you can use the Hyperspace Artillery in explored locations later in the game, as well as the Hyperspace Sensor station (both of which require previously explored locations to be used).

The Passive Probe (researched at the Technology Lab) is a wonderful ability which allows you to drop a weak and barely visible structure anywhere your Scout goes. Costing just a small amount in supplies and of course special energy, the Passive Probe will allow you to see a relatively large area around it every twenty seconds. The Passive Probe is invisible on the minimap screen, which means a player has to actually look for the damn things. As a consequence, you can usually get away with placing them close to unarmed mining stations, as well as research stations, which will give you a quick glimpse into what your opponent is doing. It is also extremely wise to place these probes at choke points so that you know when a fleet is passing through. To avoid their destruction, be careful not to place them too close to busy thoroughfares. The Passive Probe can also be placed in sensor-blocking nebulae, where it will dutifully illuminate the contents of the nebulae.
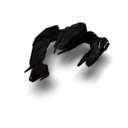
A-20 Attack Destroyer - Construction Yard
(passive: Autonomous Defense AI - strong versus medium range, weak versus support ships)

A medium ranged, but small-sized destroyer, this fast vessel is equipped with a passive that allows it to withstand attacks from medium ranged warships more easily, yet take more damage from support vessels and do reduced damage to them as well. The “Bug” is the well-rounded, early-game work horse of the Dominion armada. Fast and agile, its beam weaponry allows it to deal equal damage to almost any unit or structure. Cheaply made and easily destroyed, these ships begin to show effectiveness in large groups of ten or more, where their relatively high firepower compensates for their lower defenses. Be especially careful to keep these vessels away from support ships and vessels equipped with the Single Stage Energy Conduits passive as the Attack Destroyer will quickly fall before these types of units.

Setting a collision course with an enemy vessel does not require much training. As such, this ability is available to the Attack Destroyer without the need for research. When an enemy vessel is targeted, the A-20 will move at ramming speed and attempt to cripple the vessel by causing moderate amounts of hull damage, disabling the target ship’s engines, and possibly crushing one of the subsystems. As a Jem’hadar gains experience against his foe, he begins to see weak points that could be exploited, should he need to exchange his life for his enemy’s. Thus, the more experienced a ship’s First is, the greater the Collision damage. It has even been rumored that honored elders in command of veteran ships have the knowledge and experience to destroy heavy cruisers and even some battleships with a single ram! Bear in mind that a Bug that has targeted a vessel for ramming will not fire any weapons.
During small skirmishes, it is best to use ramming when a bug is just about to lose its shields (or even later if you dare). In larger engagements, it is important to select the Bug being attacked and ram with it as soon as possible before it is destroyed. Waiting for it to become low on health will usually be too late, denying the ultimate sacrifice one can make to the Founders. There is also a 10% chance that the ship will remain intact after the collision, although the crew will certainly be killed by the impact. Building these vessels throughout the game for their ability to crush engines and push back foes is highly advisable, especially when facing the few numbers of Borg units (you can use them to push Borg vessels out of combat, or keep them from entering nebulae). Note that collision will only do 50% damage to stations and civilian targets. Be careful not to ram the Romulan’s Borg mixed-tech frigate, as it is considered a station.
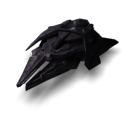
A-26 Bomber - Construction Yard + Prototype
(passive: Fast Tracking Computers - strong against short range, weak against long range)

A long-ranged and small destroyer, the A-26 Bomber is armed with a passive which allows it to deal increased damage to short range vessels while taking more damage from long ranged units. Although its passive enables it to deal roughly the same amount of damage as the Bug to short ranged and small vessels, it is best used against medium and large sized vessels. This advantage is countered by the warship’s low Defensive Value and forward firing arc, meaning that retreat is usually not an option for this vessel (as it is not especially fast and cannot protect itself while on the run). Make sure to have this ship set to low movement autonomy to ensure that it fires from its maximum range, hopefully keeping it at the edge of the battle.

The Tetryon Photon Torpedo, available at the Technology Lab, is an artillery-ranged torpedo that deals triple damage to structures, making it an excellent counter against turrets. Using every one of these torpedoes on a single high priority target will ensure that it is softened up for the knockout blow that the conventional weapons are sure to give. Note that if the Romulans are employing the Borg mixed-tech Frigate, it is considered a station and will receive triple damage from the Tetryon Photon Torpedo as well. Use the special against this particular ship with gusto.
S-2 Escort Cruiser - Construction Yard + Prototype
(passive: Tactical Weapon Arrays - strong versus long range, weak versus short range)

As a short ranged and small sized cruiser, this torpedo and beam armed vessel is a fast interceptor unit. It is equipped with a passive which enables it to deal increased damage to long ranged targets, while receiving more damage from short ranged units. The S-2 has two roles - that of a support cruiser as well as a long ranged unit eliminator. If used as a support unit, by staying on the edge of an engagement, these ships can provide a significant boost in firepower for the entire fleet through the careful use of Alpha Ketracel White. Likewise, a handful of S-2’s kept in reserve can quickly eliminate long ranged vessels in an enemy fleet, or even perform hit and run attacks due to their high speed. Note that although their beam weaponry has a 360 degree firing arc, the torpedo is limited to frontal engagements only.

Alpha Ketracel White (researched at the Technology Lab) boosts the combat effectiveness of all ships within a short range by 30% for 10 seconds. This powerful ability comes at a cost, however. Not all Jem’hadar react well to the new White and casualties of about 5% can be expected with each use. Since the ability does not stack, it is best to manually control this special, using a different ship every ten seconds to ensure maximum effectiveness. Any fleet that relies heavily on the White to achieve victory will have to eventually return to a yard to re-crew, lest their crew indicator fall into the yellow and red, reducing combat effectiveness and nullifying any advantage.
C-11 Interception Destroyer - Construction Yard + Prototype
(passive: wolf in sheep's clothing)

A medium ranged and small sized vessel, the weakly armed C-11 is the Dominion’s first real support vessel. Do not be fooled by the rather low Defensive Value - the System Value makes the C-11 just a hair better than a Bug at absorbing damage, and if micromanaged out of combat, the C-11 can reenter in just a few seconds. For this reason, the C-11 can almost outright replace the Attack Destroyer when facing an opponent who relies on Autonomous Defense AI equipped units. In general, since the abilities it utilizes more than make up for its apparent lack of combat prowess, make at least half a dozen of these after you have a strong core of more sturdy Dominion units with their special abilities researched.

The Energy Beacon special ability is the standard support power for the C-11. This special is useful in groups of three or more, where it can quickly recharge the energy of an entire allied fleet, assuming the vessels are kept in close proximity to each other. Each use recharges ten special energy of every ship and station in the affected area, save for any C-11s and Hyperspace Artilleries. This is especially effective when used to specifically recharge the A-26 Bomber, C-17 Siege Cruiser, and V-13 Battleship, as they have powerful direct damage abilities.

Researched at the Technology Lab, Weapon Focus is an area of effect ability which spreads out from the C-11 using it. It increases weapon range by 25%, and although this ability is rarely used, it could have some application against ships attempting to flee your forces, or if you desire to stay out of range from a defensive turret. This ability does not last long, so executing it usefully is often a great challenge and ends up having less priority than the C-11’s other abilities.

The tertiary support power, Cascade Feedback, is researched at the Technology Lab and is designed to do heavy damage to support ships as well as deplete their special energy. It is best to use en masse to be effective. A rather useful ability if you are facing opponents who have researched powerful offensive special weapons (such as the Plasma Coil and Field of Fire).
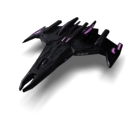
Breen Cruiser - Construction Yard + Prototype
(passive: Single Stage Energy Conduits - strong versus medium range, battleships, weak versus stations, destroyers)
A long ranged and medium sized cruiser which is available only to the Breen avatar, this vessel has a restricted firing arc. In addition, it is furnished with a passive that causes it to deal increased damage to medium ranged warships and battleships, at the expense of losing subsystems much more quickly once the shields are down. It also deals far less damage to stations and destroyers. Keep it away from vessels which deal direct hull damage or have abilities that do so, for these can quickly incapacitate these warships. That being said, bear in mind that it has an unusually high hull strength, and thus can withstand more attacks unshielded before exploding than other cruisers. As the Breen Cruiser is not very fast, it is thus fitting that it is equipped with what amounts to a late game weapon system. Its Breen Energy Torpedoes do reduced damage to small sized vessels, but increased damage to large sized vessels. Keep in mind that it also does greatly reduced damage to stations.

Researched at the Technology Lab, the Breen Cloak gives the vessel a basic three second cloak and allows it to move around undetected, giving it first-strike capabilities. While it cannot recloak right after decloaking, it usually has enough energy to do so after about 20 seconds or so, allowing the cruisers to slip back into the shadows. Regardless if you are planning on using this vessel for quick hit and runs, or normal fleet action, the Breen Cloak will prove indispensible for allowing you to sneak off the battlefield and conserve warships.
B-8 War Frigate - Construction Yard + Prototype
A long ranged and medium sized cruiser, the War Frigate is equipped with a great amount of pulse armament and a tetryon torpedo. This allows it to deal a large amount of damage to your opponent’s small sized vessels. The vessel also comes standard with the Transporter Assault ability, which causes it to deplete a target’s shields, and thereupon begin to transport Jem’Hadar over to the vessel in question without lowering its own shields. If using this warship to capture enemy vessels, be sure to exclusively target weakly crewed vessels (such as most destroyers) while pounding the more powerful vessels with the normal weaponry. The Transporter Assault (or normal transport) set on high weapons autonomy can also be very useful when enemy vessels attempt to retreat and cloak, thereby dropping their shields. The B-8 War Frigate has powerful shields for being available in the early game and is a great fleet filler which can keep your own ships crewed. Note that it is rather difficult to retreat the B-8 as the majority of its firepower is forward firing.

The Isotopic Subspace Bomb is researched at the Technology Lab and is an incredibly useful special. Dropped from fleeing War Frigates, the IS bomb is great in fleet action, as it can shut down the engines of your enemy for 13 seconds. This gives enough time to use the Hyperspace Artillery on helpless vessels, or retreat damaged ships out of range without fear of reprisal. It is also an extremely useful special weapon if you are facing swarms of limited firing arc or short ranged vessels.
T-15 Heavy Cruiser - Large Construction Yard
(passives: Ablative Armor Plates - strong versus short range, weak versus long range)
This medium sized vessel is great at mopping up small sized units due to its mainly pulse based weaponry. The fact that it is a medium sized ship equipped with a passive that allows it to take reduced damage from short ranged ships (at the expense of doing slightly less damage to long ranged ships) makes it wonderful at taking on short ranged ships. This vessel is thus best used to counter your opponent's interceptors, but can also be used to quite easily destroy enemy mining vessels due to its relatively quick velocity and pulse weaponry. In the later stages of a game, the Heavy Cruiser should be phased out as you are attacked by more and more large sized vessels. Even if those ships are short ranged, the T-15 will do much less damage to them and not earn its keep. Note that due to its forward firing weaponry, it is rather difficult to flee from battle.
C-17 Siege Cruiser - Large Construction Yard + Prototype
(passive: Extra Energy Stores - strong versus stations)

A medium ranged and sized warship, the C-17 comes with a passive which allows it to deal increased damage against stations, although shield regeneration rates are diminished. The C-17 doubles as both the Dominion’s top tier support vessel and one of its effective heavy cruisers (and thus can be built in larger numbers). It is most efficiently used against fleets with larger targets in fewer numbers, as this vessel does best against single targets, not a group. It is especially focused against structures, making assaults against bases effective. It is quite difficult to retreat with this vessel due to its forward firing weaponry.

Phase Shield is the standard skill for this vessel and is a most useful ability when a C-17 makes first contact with an enemy fleet. Use Phase Shields if you intend for this vessel to be in the front lines and tank the first few volleys of an attack. This ability is also great against the Borg, or a group of many smaller ships to create high offensive power, and will give an overwhelmed C-17 some survivability. This also makes retreats much easier.

Investigated at the Technology Lab, the EM Blast is the older cousin to the Federation’s Sensor Blackout. It will drop the firing rate of three ships in the area of effect by 50% for 12 seconds. This is best used when you have multiple C-17s in you fleet, so that you can blanket the area with multiple effects. Due to the dynamic role of the C-17, this ability can be researched immediately, or even after a good handful of C-17’s have been produced, as the Phase Shield is a very effective first level ability. If you do not wish to produce many C-17’s, the EM Blast will prove a very necessary ability since the unit will be acting in much more of the support role.

Tetryon Disruptor is researched at the Technology Lab. The “pink beam of death” is an artillery range beam that gives a powerful offensive boost to the C-17. Another ability best used against a highly defensive target, the Disruptor is good for attacking larger targets all at once, whether it be a station or a Borg Sphere. Since it is especially useful in base assaults, as well as instantly destroying Borg vessels (before they can engage regenerative capabilities for instance), consider your opponent’s position before researching the ability. Against most non-Borg vessels, grouping between two to four C-17's at a time to use this ability on your opponent's cruisers and battleships and destroy them instantly is extremely useful. This ability should be researched as soon as possible, as although it will take away your capability of using the EM Blast as frequently, it is a wonderful psychological weapon, as well as an excellent way to remove your opponent's large vessels from battle with little chance for retaliation or mitigation.
B-5 Battle Cruiser - Large Construction Yard + Prototype

A large sized and short ranged (medium ranged for Puretech) vessel, this warship is quite speedy. More of a fighter carrier and a heavy cruiser combined, the B-5 is more than the Dominion’s last, best hope for victory. The ship itself is effective in its own right, with a strong defense, which allows it to be a front-line ship. Fighters will follow the attack orders of the mother carrier unit, and if you want them to stop attacking a particular unit, just hit the stop command. Its fighters do moderate damage as well and can serve to distract and draw in enemy forces if they aren't being micromanaged well. Puretech increases all the attributes of this ship by three, as well as the range to medium, but the vessel is highly recommended for both avatars. Keep in mind that much of the damage the actual warship does in the form of its torpedoes - which are forward firing only. Fighters share the resistances and strengths associated with the parent unit.

The Biowarhead upgrade equips your fighters with specialized weaponry that gets a chance to disable the life support systems of a target vessel. Since the fighters will keep these warheads until they fire them in combat (whereupon you will have to rearm them), it is a wise idea to discharge this ability long before fighting breaks out, that way you may make use of the ability in combat rather quickly. Likewise, be sure to have each fighter carrier attack a separate vessel (the ability will not work on stations) to make the best use of this ability. The research for the upgrade is inexpensive. It is recommended to purchase it, as it is a nice way to make fighters even more useful.
V-13 Battleship - Large Construction Yard + Prototype

A medium ranged and large sized battleship, this warship is effectively Puretech’s end game vessel. The V-13 represents some of the best qualities of a battleship: large hit points, high offense, and a powerful special for a cheap price. After building B-5 Battle Cruisers and a few C-17s for support, this ship will usually become your fleet’s backbone and a front-line vessel when a battle begins.

Researched at the Technology Lab, Excessive Strike does high hull damage and bypasses shields. The ability can thus run havoc against a fleet if you have enough V-13s (resulting in instant kills). It is best used when engaged in the middle of an opposing force, to provide the largest spread of damage, with C-11s recharging the ability to unleash the special weapon again and again. It is recommended that you only trigger a few Excessive Strikes at a time to reduce the risk of overkill. Against weaker cruisers, three abilities at once is wise, and against stronger vessels, up to five. Against ships that have Single Stage Energy Conduits, this ability will often cripple them in a single shot. Research this special as soon as possible as it will dramatically increase the firepower your battleships can unleash.
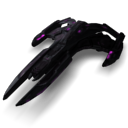
Breen Battleship - Large Construction Yard + Prototype
(passive: Single Stage Energy Conduits - strong versus medium range)

A long ranged and large sized battleship, this vessel has a 360 axis of firepower. In addition, it is furnished with a passive that causes it to deal increased damage to medium ranged warships and battleships, at the expense of losing subsystems more quickly once the shields are down. It also deals far less damage to stations and destroyers with its torpedoes. Also keep it away from vessels which deal direct hull damage or have abilities that do so, for these can quickly incapacitate these warships. Powerfully armed and armored, the Breen Battleship is a behemoth for the Breen Alliance with both torpedoes and beam weapons. However, its slow speed can really tie down an escorting fleet, making it most useful as either a siege battleship to disable turrets with its special ability, or as a defensive, mobile turret for the Breen avatar. Its Breen Energy Torpedoes also do reduced damage to small sized vessels, but increased damage to large sized vessels, which makes it ideal as a late game battleship killer.

The Dampening Missile is researched at the Technology Lab and is a very effective special weapon. The random disable and shield draining effect of this ability make this ability great against powerful turrets or other large vessels. Using this ability in groups of two will render an important target useless, as well as significantly draining its shield energy. As the ability is quite expensive, try to research it after only a few Breen Battleships to improve their strength against your opponent’s large sized units.
S-7 Defender - Large Construction Yard + Prototype
(passive: High Density Shield Generators, Charged Polaron Beam - strong versus long range, large-sized units)
Equipped with a passive that reduces damage taken from long ranged sources and another that increases damage dealt to enemy large sized units, this large sized and long ranged warship is a behemoth. In many ways the Puretech version of the Breen battleship, the S-7 acts much like a mobile turret for base defense. Simply not fast enough to support a fleet effectively; it is more useful in backing up Perimeters or other defenses, especially when considering that its weaponry is forward firing only. With its beam based weaponry it will do equal damage to all classes, and due to its passives it should always be targeting your opponent’s battleships.

The Core Blast (at the Technology Lab) is especially useful for incapacitating your opponent’s high priority targets, which would otherwise be advancing on your defense. Much like the A-20 Attack Destroyer’s Collision ability, the Core Blast pushes away a targeted unit for ten seconds and disables its engines. Against Borg Cubes, Romulan Tavaras, and even less important battleships this ability will help lower the overall firepower being thrown at your Cloning Facilities or Perimeters. However, you will note that this ability is horrendously expensive. As a consequence, if you are going to research it, it should only be done as a last ditch defense to support your weaker long range units, or for an assault where you know you will be coming up against powerful battleships.
Hyperspace Artillery - Worker Ship + Large Construction Yard + Technology Lab + Ketracel White Facility

Built by a worker ship, this vessel delivers a five second ultimatum in the middle of the blast radius, warning ships to retreat from the zone or be destroyed. Despite this warning, there will usually be ships that do not clear this. Although the blast will not destroy most vessels except in the very center of the blast zone, this serves as an excellent psychological tool. It is easy to force players to disperse their ships, especially when grouped with an ally. With Puretech, you can build a total of two artilleries. This dual power is enough to critically damage many structures. Keep in mind that other than the Artillery weapon, this slow vessel is unarmed. Note also that the Hyperspace Artillery does not have to stay put while firing its weapon and it does not even have to be facing its target to attack!
One tactic is to use these when your fleet is engaged with another, targeting right on top, yet slightly to the rear of their fleet. This forces them to worry about moving their ships and not about micromanaging their fleet, allowing you to destroy important targets without much reprisal. Any forward firing units they may have are not firing on you, and any ships that don’t make it out of the blast will be fairly well damaged. With their fleet in disarray, picking off their ships one by one becomes much easier while they try and regroup.

If you have access to two artillery strikes (as Puretech), setting one slightly ahead of an assaulting armada (before it reaches your fleet) and another in the direct path of the evading vessels will certainly cause most of their ships to be hit by a minimum of one of these strikes. Likewise, many players tend to bunch up their vessels. This makes setting up a strike in front of a forward moving enemy armada ideal, as it is quite difficult to ensure that all ships bank out of the way in time to avoid the barrage. Some short ranged vessels may be able to clear the blast range before the attack. Many medium and almost all long ranged vessels will most likely not make it out if they weren’t moving beforehand. This ability can also of course be used in conjunction with Intelligence Report or Graviton Scan to easily destroy cloaked (and thus shieldless) vessels.
This unit deals greatly increased damage to stations, meaning it can hit vital targets without having to go near any defenses. For this reason it excells as a bunker buster, forcing an opponent to engage your forces and leave his or her defenses behind. Due to its strategic range weaponry, placing these artilleries behind fortifications to attack oncoming fleets (or enemy installations) is entirely feasible.
Special Dominion Stations
Hyperspace Sensor Station - Large Construction Yard + Technology Lab
(passive: Graviton-Tachyon Ping - detects all cloaked units in a large radius)


With a powerful sensor suite, this is an incredibly useful station. It will allow you to reveal any location that you have previously scouted and regenerates special energy quickly enough to give you the ability to keep a near constant lookout. Gaining intelligence as to where a fleet is or what ships the enemy is building will be invaluable in deciding whether to attack or defend. The Hyperspace Sensor system also comes equipped with a long range graviton-tachyon ping. Ships equipped with an advanced cloak beware (Tavara, Talon, and BortaS).
Perimeter - Large Construction Yard + Technology Lab
(passive: Tachyon Ping - detects non-advanced cloaked units in medium range)

During the Dominion war, the Founders realized the potential of digging in to gain the time to build up powerful offensive fleets. Many Perimeters were being constructed during the Dominion War, but were never completed. Capable of providing heavy defense against intruders, this defensive structure maybe be upgraded in a similar fashion to a starbase, with both offensive and defensive upgrades. Artillery range AT-Charges may be integrated as well, giving the Perimeter a powerful offensive ability against small-sized vessels. A single charge is enough to overwhelm the shields of first tier destroyers, and a few more can wipe out the strongest small sized units, as well as many medium starships.
Accordingly, really only upgrade the defensive/offensive abilities when attacked, but immediately install AT-Charges if you know your opponent is fielding destroyers and cruisers. Bear in mind that AT-Charges can damage your own units and the likelihood of AT-Charges firing can be determined by the autonomy settings. As the materials necessary for building these structures are costly and rare, Vorta commanders may only build three in any given sector.
Dominion Turret System
Sensor Station
(passive: Graviton-Tachyon Ping - detects all in-range cloaked vessels)


With a very high defensive value, and a moderately high system value, this station is quite good at staying alive. Its Graviton-Tachyon Ping is long range and can detect even those vessels that have an Advanced Cloaking Device. The Sensor Station also comes standard with Intelligence Report. This ability is fairly expensive, but is useful in the late game to determine where cloaked ships are located. The station is somewhat expensive in terms of supply, but its usefulness should not be underestimated.

Researched at the Technology Lab, when this station is equipped with the Remote Tachyon Beacon, it allows any vessel you possess to essentially become a detector. By using this ability in the vicinity of a Dominion vessel you control it will trigger a medium-range Tachyon Ping that will emanate from the center of that vessel. The Sensor Station itself has enough special energy to use this ability almost three times. Remember that the total amount of energy can be augmented by the C-11's Energy Beacon.
Phaser Sentry
(passive: EPS Control Nodes - strong versus shields, weak versus pulse weaponry)
For roughly the cost of an A-20 Attack Destroyer you get a turret with several times the durability and firepower of the Bug. Dealing a fair amount more damage to the shields enables this turret to be especially useful against non-Borg opponents, although it will take slightly more damage from pulse based weapons as well. Phaser Sentries make excellent deterrents and are quite powerful in their own right. Since they are so cheap and relatively quick to build, you can even place several around each mining outpost if you are forced on the defensive. Stripping shields off your foes allows them to be excellent support fire as well, that way your main mobile forces may destroy subsystems at their leisure.
